Skip the passwords. Here’s how to build an Azure Function with a secure database connection using Azure’s managed identity.
Working with Azure Functions and SQL databases? You probably know the struggle of managing connection strings and keeping credentials secure. There’s a better way.
Managed identity lets your Azure Functions connect to SQL databases without storing a single password. No secrets to rotate, no credentials to leak. Just secure, automatic authentication.
What You’ll Build
A simple Azure Function that tests SQL database connections using managed identity. The function will:
- Connect to your SQL database securely
- Run a test query to verify everything works
- Return detailed connection info
- Handle errors gracefully
Before You Start
You’ll need:
- An Azure subscription
- Basic C# knowledge
- Visual Studio or VS Code
- Azure Functions Core Tools
Step 1: Create a Managed Identity
First, create the identity that will authenticate to your database.
In Azure Portal:
- Search for “Managed Identity” and click Create
- Choose “User assigned”
- Pick your resource group and region
- Name it something like
func-sql-identity - Click Create
- Copy the Client ID from the overview page
Using Azure CLI:
# Create a user-assigned managed identity
az identity create \
  --name func-sql-identity \
  --resource-group my-rg \
  --location eastus

# Get the client ID (you'll need this later)
az identity show \
  --name func-sql-identity \
  --resource-group my-rg \
  --query clientId \
--output tsvStep 2: Set Up Database Access
Connect to your SQL database and run this SQL:
-- Replace with your managed identity name

CREATE USER [func-sql-identity] FROM EXTERNAL PROVIDER;
ALTER ROLE db_datareader ADD MEMBER [func-sql-identity];
ALTER ROLE db_datawriter ADD MEMBER [func-sql-identity];This gives your managed identity permission to read and write data.
Step 3: Build the Azure Function in VS Code
Let’s create the project step by step in VS Code.
Create the Project Structure
Open VS Code and create your project:
- Open VS Code
- Press Ctrl+Shift+P (or Cmd+Shift+P on Mac) to open the command palette
- Type “Terminal: Create New Terminal” and select it
- In the terminal, navigate to where you want your project:
cd C:\Projects # or your preferred locationmkdir SqlConnectionTestcd SqlConnectionTest
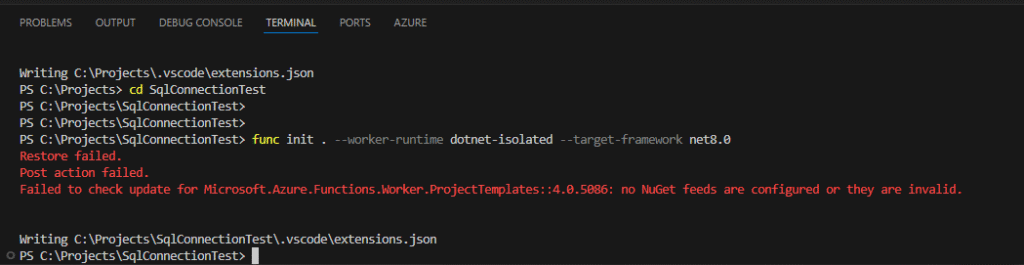
Initialize the Azure Function:
func init SqlConnectionTest --worker-runtime dotnet-isolated --target-framework net8.0This creates several files. We’ll modify most of them.
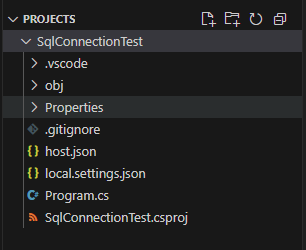
Your Project Structure Should Look Like This:
Edit the Project File
Open the project file:
- In VS Code, click “File” → “Open Folder”
- Select your SqlConnectionTest folder
- Open SqlConnectionTest.csproj (it should be in the file explorer on the left)
- Delete all content and replace with:
<Project Sdk="Microsoft.NET.Sdk">
<PropertyGroup>

    <TargetFramework>net8.0</TargetFramework>

    <AzureFunctionsVersion>v4</AzureFunctionsVersion>

    <OutputType>Exe</OutputType>

    <ImplicitUsings>enable</ImplicitUsings>

    <Nullable>enable</Nullable>

  </PropertyGroup>

  <ItemGroup>

    <PackageReference Include="Microsoft.Azure.Functions.Worker" Version="1.19.0" />

    <PackageReference Include="Microsoft.Azure.Functions.Worker.Extensions.Http" Version="3.1.0" />

    <PackageReference Include="Microsoft.Azure.Functions.Worker.Sdk" Version="1.15.1" />

    <PackageReference Include="Microsoft.Data.SqlClient" Version="5.1.1" />

  </ItemGroup>

  <ItemGroup>

    <None Update="host.json">

      <CopyToOutputDirectory>PreserveNewest</CopyToOutputDirectory>

    </None>

    <None Update="local.settings.json">

      <CopyToOutputDirectory>PreserveNewest</CopyToOutputDirectory>

      <CopyToPublishDirectory>Never</CopyToPublishDirectory>

    </None>

  </ItemGroup>

</Project>
5. Save the file (Ctrl+S)
Create Program.cs:
Delete the existing Program.cs and create a new one:
- Right-click on Program.cs in the file explorer and select “Delete”
- Right-click in the file explorer and select “New File”
- Name it Program.cs
- Add this content:
using Microsoft.Extensions.Hosting;
var host = new HostBuilder()
    .ConfigureFunctionsWorkerDefaults()
    .Build();

await host.RunAsync();- Save the file
Create the Main Function File
Create a new file for your function:
- Right-click in the file explorer and select “New File”
- Name it SqlConnectionFunction.cs
- Add this content:
using System.Net;
using System.Text.Json;

using Microsoft.Azure.Functions.Worker;

using Microsoft.Azure.Functions.Worker.Http;

using Microsoft.Data.SqlClient;

using Microsoft.Extensions.Logging;

namespace SqlConnectionTest

{

    public class SqlConnectionFunction

    {

        private readonly ILogger _logger;

        public SqlConnectionFunction(ILoggerFactory loggerFactory)

        {

            _logger = loggerFactory.CreateLogger<SqlConnectionFunction>();

        }

        [Function("TestConnection")]

        public async Task<HttpResponseData> TestConnection(

            [HttpTrigger(AuthorizationLevel.Function, "get")] HttpRequestData req)

        {

            _logger.LogInformation("Testing SQL connection with managed identity");

            var response = req.CreateResponse(HttpStatusCode.OK);

            response.Headers.Add("Content-Type", "application/json");

            try

            {

                var result = await TestDatabaseConnection();

                await response.WriteStringAsync(JsonSerializer.Serialize(result, new JsonSerializerOptions { WriteIndented = true }));

            }

            catch (Exception ex)

            {

                _logger.LogError(ex, "Connection test failed");

                var error = new {

                    success = false,

                    error = ex.Message,

                    tip = "Check managed identity permissions and SQL server settings"

                };

                response.StatusCode = HttpStatusCode.InternalServerError;

                await response.WriteStringAsync(JsonSerializer.Serialize(error));

            }

            return response;

        }

        private async Task<object> TestDatabaseConnection()

        {

            var server = Environment.GetEnvironmentVariable("SqlServer");

            var database = Environment.GetEnvironmentVariable("DatabaseName");

            var clientId = Environment.GetEnvironmentVariable("ManagedIdentityClientId");

            if (string.IsNullOrEmpty(server) || string.IsNullOrEmpty(database))

            {

                throw new Exception("SQL Server or Database name not configured");

            }

            var connectionString = string.IsNullOrEmpty(clientId)

                ? $"Server={server};Database={database};Authentication=Active Directory Default;"

                : $"Server={server};Database={database};Authentication=Active Directory Managed Identity;User Id={clientId};";

            using var connection = new SqlConnection(connectionString);

            await connection.OpenAsync();

            using var command = new SqlCommand("SELECT @@VERSION, SYSTEM_USER", connection);

            using var reader = await command.ExecuteReaderAsync();

            await reader.ReadAsync();

            return new

            {

                success = true,

                message = "Connected successfully",

                sqlVersion = reader.GetString(0),

                connectedAs = reader.GetString(1),

                server = server,

                database = database,

                authType = string.IsNullOrEmpty(clientId) ? "System Managed Identity" : "User Managed Identity"

            };

        }

    }

}- Save the file
Update local.settings.json
Edit the local settings:
- Open local.settings.json (should already exist)
- Replace the content with:
{
"IsEncrypted": false,

  "Values": {

    "AzureWebJobsStorage": "UseDevelopmentStorage=true",

    "FUNCTIONS_WORKER_RUNTIME": "dotnet-isolated",

    "SqlServer": "your-server.database.windows.net",

    "DatabaseName": "your-database",

    "ManagedIdentityClientId": "your-client-id-here"

  }

}- Replace the placeholder values with your actual server name, database name, and client ID
- Save the file
Create/Update host.json
Check if host.json exists, if not create it:
- If host.json doesn’t exist, right-click in file explorer and select “New File”
- Name it host.json
- Add this content:
{
"version": "2.0",

  "logging": {

    "applicationInsights": {

      "samplingSettings": {

        "isEnabled": true,

        "excludedTypes": "Request"

      }

    }

  }

}- Save the file
Install Dependencies
Restore NuGet packages:
- Open the terminal in VS Code (Ctrl+“ or Terminal → New Terminal)
- Run:
dotnet restore
Run the function locally to test:
- In the terminal, make sure you’re in the project directory
- Run:
- func start
- VS Code might ask to install Azure Functions Core Tools – click “Yes” if prompted
- Your function will start and show a URL like
http://localhost:7071/api/TestConnection - Open this URL in your browser to test
Note: Local testing will use your personal Azure credentials, not the managed identity.
Step 4: Deploy to Azure
Create Function App and Storage Account
First, create the required Azure resources:
# Create a storage account (required for function apps)
az storage account create \

  --name mystorageaccount123 \

  --location eastus \

  --resource-group my-rg \

  --sku Standard_LRS

# Create function app

az functionapp create \

  --resource-group my-rg \

  --consumption-plan-location eastus \

  --runtime dotnet-isolated \

  --functions-version 4 \

  --name my-sql-func \

--storage-account mystorageaccount123Assign Managed Identity to Function App
# Get the managed identity resource ID
IDENTITY_ID=$(az identity show \

  --name func-sql-identity \

  --resource-group my-rg \

  --query id \

  --output tsv)

# Assign the managed identity to the function app

az functionapp identity assign \

  --name my-sql-func \

  --resource-group my-rg \

--identities $IDENTITY_IDConfigure Application Settings
# Get the client ID of your managed identity
CLIENT_ID=$(az identity show \

  --name func-sql-identity \

  --resource-group my-rg \

  --query clientId \

  --output tsv)

# Set app settings

az functionapp config appsettings set \

  --name my-sql-func \

  --resource-group my-rg \

  --settings \

    "SqlServer=your-server.database.windows.net" \

    "DatabaseName=your-database-name" \

"ManagedIdentityClientId=$CLIENT_ID"Deploy Your Function
# Deploy the function code
func azure functionapp publish my-sql-funcStep 5: Test It Out
Get Function URL
Get your function URL from the Azure portal or using CLI:
# Get function keys
az functionapp function keys list \

  --function-name TestConnection \

  --name my-sql-func \

--resource-group my-rgTest the Function
Call your function URL:
https://my-sql-func.azurewebsites.net/api/TestConnection?code=your-function-key
You should see something like:
{
  "success": true,
    "message": "Connected successfully",
  "sqlVersion": "Microsoft SQL Azure...",
  "connectedAs": "func-sql-identity",
  "server": "your-server.database.windows.net",
  "database": "your-db",
  "authType": "User Managed Identity"
}
Common Issues and Fixes
“FUNCTIONS_WORKER_RUNTIME mismatch”
- Make sure your project has <OutputType>Exe</OutputType>
- Use the correct NuGet packages for isolated functions
- Restart the function app after changes
“Login failed for user”
- Check that the managed identity exists in SQL
- Verify the identity is assigned to your function app
- Ensure your SQL server allows Azure services
“Could not find stored procedure”
- The managed identity needs proper database permissions
- Run the SQL commands from Step 2 again
“Storage account not found”
- Make sure the storage account name is globally unique
- Verify the storage account is in the same region as your function app
Why This Matters
Using managed identity for database connections gives you:
- No passwords to manage – Azure handles authentication automatically
- Better security – No connection strings with embedded credentials
- Easier rotation – No manual credential updates needed
- Audit trails – Clear tracking of who accessed what
Taking It Further
Now that you have secure database connections working, you can:
- Add more database operations to your function
- Set up connection pooling for better performance
- Add retry logic for transient failures
- Monitor connections with Application Insights
Wrapping Up
Managed identity might seem complex at first, but it’s worth the setup. Once configured, you get secure, automatic database authentication without the headache of managing passwords.
The key is getting all the pieces connected – the managed identity, database permissions, and function configuration. Take it step by step, and you’ll have bulletproof database connections in no time.
Remember: secure code is good code, and managed identity is one of the best tools Azure gives us for database security.