It is important that you manage access to your Azure SQL Server so you have security and operational efficiency. Entra ID admin (formerly Azure Active Directory admin) enables user authentication and simplifies identity management for your SQL Server. This post will walk you through the steps to set up an Entra ID admin, discuss potential risks, and share best practices to keep your database secure and efficient.
Why Enable Entra ID Admin in Azure SQL Server?
Integrating Azure Active Directory (Entra ID) with Azure SQL Server offers numerous benefits:
• Passwordless and MFA-Enabled Access: For more secure, passwordless logins, replace shared credentials.
• Centralized Management: Enable identity and access management across data-diverse environments.
• Role-Based Access Control (RBAC): Restrict access rights to the data by role, so that the permissions granted are defined at a granular level.
• Enhanced Compliance: It simplifies the auditing processes and ensures that the company meets all industry standards.
Using Entra ID Admin aligns your database management with modern enterprise-grade security standards.
How to Enable Entra ID Admin in Azure SQL Server
Follow these detailed steps to configure Entra ID Admin for your Azure SQL Server.
Step 1: Create an Azure AD Security Group
Creating a security group in Azure Active Directory simplifies user and access management.
- Go to the Azure Portal and navigate to Azure Active Directory > Groups > New Group.
- Choose Security as the group type.
- You can enter any descriptive name for it like for example AzureSQLAdmins.
- Add group owner.
- Select Add users or groups that will be members to access the SQL server as Entra ID Admin
- Click Create.
Step 2: Assign RBAC Roles to the Security Group
To enable the group to manage SQL Server resources like firewalls and backups:
- Switch to the Azure Portal and go to your Azure SQL Server.
- Select Access Control (IAM) > Add Role Assignment.
- Select a role as SQL Server Contributor or create one according to the user requirements.
- Assign the role to your security group.
- Confirm the role assignment.
Step 3: Navigate to Your Azure SQL Server Instance
- On your Azure Portal, go to your Azure SQL Server instance.
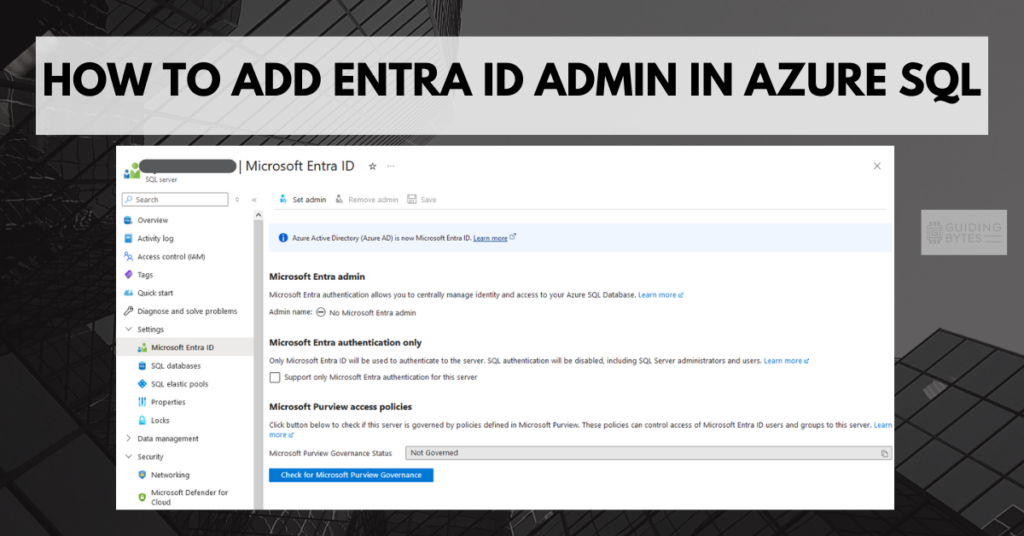
- Under the Settings section, select Microsoft Entra ID.
Step 4: Set the Entra ID Admin
- Click on Set Admin in the Active Directory Admin section.
- Search for the security group you created earlier.
- Select the group and click Save.
Step 5: Add Your IP Address to the Firewall
To ensure you can successfully connect to your Azure SQL Server, you need to add your IP address to the firewall:
- In the Azure Portal, navigate to your SQL Server instance.
- In the Networking menu, navigate to the Firewall rules section.
- In the Firewall rules settings, click Add client IP to add your current IP address to the firewall automatically.
- Alternatively, you can manually enter your IP address in the Start IP, and End IP fields, and click Save.
Step 6: Verify Configuration
- Use SQL Server Management Studio (SSMS) to test connections and choose Microsoft Entra MFA or Microsoft Entra Default option in the Authentication.
- Make sure the user you’re working with has the necessary rights and can use the resources of a database.
Adding Users to the Security Group
To onboard new users and grant them access:
- Go to Azure Active Directory > Groups.
- Select the appropriate group For Example “AzureSQLAdmins“.
- Click Members > Add Members.
- Type into the ‘search’ bar the name of the users you wish to add then tick the checkboxes next to their names. Click Save to confirm.
Risks to Consider
When configuring Entra ID Admin, it’s important to be aware of potential risks:
- Over-Permissioning: It might open some sensitive resources when assigning large and unnecessary roles like the Contributor role.
- Configuration Complexity: Incorrectly configuring Entra ID authentication might block users who rely on SQL authentication.
- Group Mismanagement: Increasing unnecessary participants to security groups might result to infringement.
Best Practices for Entra ID Admin in Azure SQL Server
1. Security Groups should be used for Scalability.
That means when selecting IdP administrators for security groups, it is recommended to assign admins by groups rather than give an Entra ID Admin role to a specific user.
2. Secure Conditional Access Policies
By using Azure Conditional Access, which defines levels of risk associated with location, devices, or user behavior, dictates the level of access to Azure AD possible.
3. Implement Multi Factoring Authentication (MFA) Security:
Every user that uses SQL Server should have the MFA in place so as to avoid the threats of unauthorized access.
4. Monitor and Audit Access Logs
Special attention is to be paid to users’ login activities, which is possible with the help of Azure Monitor and access logs.
5. There is no exaggeration when it comes to adhering to the principle of least privilege.
Only give ‘need-to-know ‘access rights such as installing a datawriter role in the SQL Server through the security group.
Conclusion
The inclusion of Entra ID Admin for Azure SQL Server is a great step towards improving the security of the database, as well as embracing better identity management practices. When it comes to Azure AD security group, roles assigned through RBAC and some basic principles, a firm may have a secure, scalable and efficient environment. This approach eliminates the risk of using a shared SQL authentication and is inline with intérnemental standard security.


