Still using the Basic Azure Load Balancer? It’s really time to upgrade to the Standard Azure Load Balancer.
Why?
Because Microsoft has announced the retirement of both Basic Load Balancers and Basic Public IPs by September 30, 2025, that’s a hard cutoff. No grace period, no fallback. If you don’t migrate by then, your applications will stop working — plain and simple.
But even if there wasn’t a looming deadline, upgrading to the Standard SKU is a no-brainer for any production workload. It brings zone redundancy, better monitoring, enhanced security, and — perhaps most importantly — a proper SLA.
Let’s walk through how to actually make the move, what traps to avoid, and how to pull it off with minimal pain — using both Azure Portal and Azure CLI.
Why This Azure Load Balancer Migration Matters (Even If You’re Not Feeling the Pressure Yet)
Let me share a quick story.
A team I worked with was dealing with spotty availability in their production app. Random outages, no real metrics, and a backend pool that was quietly bumping into its limit. Their setup? A Basic Load Balancer with a single-zone deployment — because “it worked in dev.”
Until it didn’t.
When a scheduled Azure maintenance hit their zone, their app went down — no redundancy, no early alerts, no quick fix.
That’s exactly why Microsoft is retiring the Basic SKUs — because they’re just not fit for the kind of resilient, distributed architecture the cloud promises today.
Key Differences: Basic vs Standard
| Feature | Basic SKU | Standard SKU |
| SLA | ❌ None | ✅ 99.99% |
| Availability Zones | ❌ Not supported | ✅ Zone-redundant |
| Backend Pool Size | Up to 100 | Up to 1,000+ |
| Monitoring | Very limited | Azure Monitor ready |
| Public IP SKU Compatibility | Basic only | Standard only |
| Network Security | Open by default | Secure by default (NSG required) |
| Status | 🚩 Retiring | ✅ Actively supported |
Heads-Up Before You Start
This is not a toggle switch or a simple setting change. Azure does not support in-place upgrades from Basic to Standard.
You’ll need to:
- Recreate the Load Balancer from scratch with the Standard SKU
- Use a new Static Public IP with the Standard SKU
- Migrate all configurations manually: frontend, backend, probes, rules
- Prepare for downtime unless you build a rolling deployment strategy
Method 1: Using Azure Portal (Step-by-Step)
This approach is ideal if you’re doing a one-off migration and want full visibility.
Step 1: Document Your Current Setup
Before you touch anything:
- Screenshot or note Frontend IP Configs, Backend Pools, Probes, LB Rules
- Export your current NSG rules
- Record the region, VNet, subnet, and IP address info
Tip: Keep the old Load Balancer running until the new one is tested and cutover is complete.
Step 2: Create a Standard Public IP
Since Basic Public IPs are also retiring, you’ll need a new Static, Standard SKU IP.
- Go to Create a resource → Public IP Address
- Set SKU to Standard
- Set Assignment to Static
- Choose the same region
- Enable Zone-redundant if supported in your region
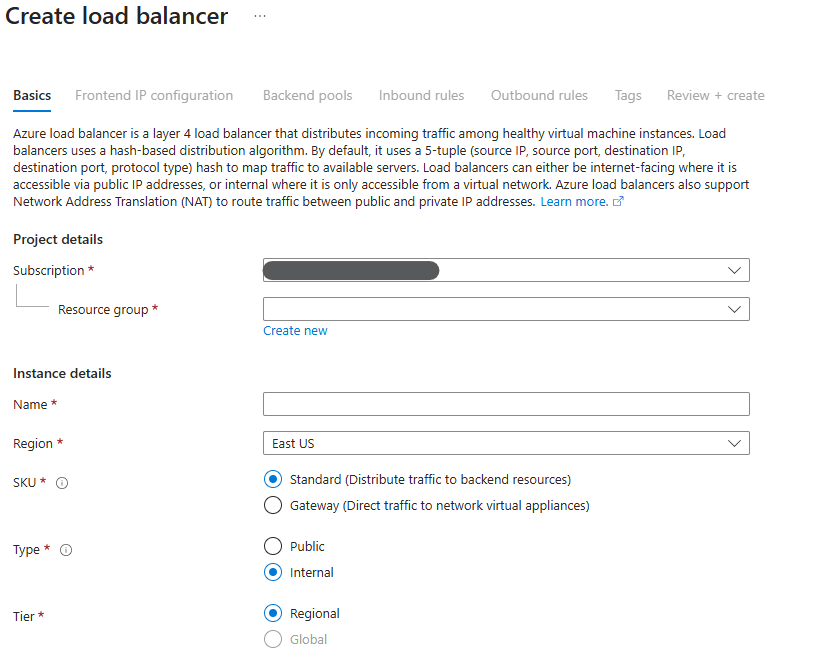
Step 3: Create the Standard Load Balancer
- Go to Create a resource → Load Balancer
- Select Standard SKU
- Use your new Public IP for frontend config
- Name your backend pool (you can reuse the old name)
Step 4: Recreate Configuration
Health Probes:
- Match protocol, port, and interval settings
- Adjust timeout if needed (Standard is stricter than Basic)
Load Balancing Rules:
- Rebuild each rule and link to correct probes/pools
- Match port mapping exactly if no app-level changes are planned
Backend Pool Members:
- Add VMs manually — match NICs to backend pool
(don’t forget scale sets if used)
Step 5: Update NSGs (Don’t Skip This!)
Standard LBs require explicit NSG rules. No traffic flows without them.
- Add inbound rules allowing:
- Traffic from the frontend IP
- Health probe traffic from Azure backend
Test connectivity before DNS cutover or app switchover.
Step 6: Switch Over
Once you’ve validated the new Load Balancer:
- Update DNS to point to the new Standard IP
- Monitor app traffic and logs
- Keep the Basic Load Balancer for a few days as rollback
Method 2: Using Azure CLI (Automated & Repeatable)
CLI is your friend when you’re managing multiple environments or want version-controlled infra.
Prep: Set Environment Variables
RESOURCE_GROUP="myRG"
LOCATION="eastus"
LB_NAME="myStdLB"
PUBLIC_IP="myStdPublicIP"
VNET_NAME="myVNet"
SUBNET_NAME="mySubnet"Step 1: Create Standard Public IP
az network public-ip create \
 --resource-group $RESOURCE_GROUP \
 --name $PUBLIC_IP \
 --sku Standard \
 --allocation-method Static \
 --location $LOCATION \
--zone 1 2 3Step 2: Create Standard Load Balancer
az network lb create \
  --resource-group $RESOURCE_GROUP \
  --name $LB_NAME \
  --sku Standard \
  --location $LOCATION \
  --frontend-ip-name FrontEnd \
  --backend-pool-name BackendPool \
--public-ip-address $PUBLIC_IPStep 3: Configure Health Probe
az network lb probe create \
  --resource-group $RESOURCE_GROUP \
  --lb-name $LB_NAME \
  --name MyProbe \
  --protocol tcp \
  --port 80 \
  --interval-in-seconds 15 \
--number-of-probes 2Step 4: Load Balancing Rule
az network lb rule create \
 --resource-group $RESOURCE_GROUP \
 --lb-name $LB_NAME \
 --name HTTPRule \
 --protocol tcp \
 --frontend-port 80 \
 --backend-port 80 \
 --frontend-ip-name FrontEnd \
 --backend-pool-name BackendPool \
--probe-name MyProbeStep 5: Attach VMs to Backend Pool
az network nic ip-config address-pool add \
 --address-pool BackendPool \
 --ip-config-name ipconfig1 \
 --nic-name myVMNic \
 --resource-group $RESOURCE_GROUP \
--lb-name $LB_NAMERepeat for all backend VMs.
When Things Go Wrong
| Problem | Root Cause | Fix |
| App not reachable | NSG blocking traffic | Add inbound rules for LB ports |
| Health probe keeps failing | Wrong probe path or port | Check app + probe config |
| Cost suddenly increased | Standard pricing includes data + rules | Review SKUs used and optimize |
| Deleted Basic LB too early | Reused public IP prematurely | Always finish testing first |
Migration Strategy (If You’re Planning Ahead)
- Week 1: Document existing infrastructure
- Week 2: Set up test Standard LB
- Week 3: Validate app routing + NSGs
- Week 4: Migrate production + monitor
Don’t wait until Q3 2025. Teams will scramble last minute, and you won’t want to be in support limbo when they do.
TL;DR: Why Standard SKU Wins
- Basic LB & IPs are retiring — you must upgrade before Sept 30, 2025
- Standard LB is production-ready: SLA-backed, scalable, zone-redundant
- Migration isn’t hard — but it needs planning and testing
- Don’t delete your old LB until you’ve fully tested the new one
Final Thoughts
This isn’t just a checkbox migration — it’s a chance to modernize your load balancing architecture. Yes, the migration has friction. But the payoff? Way fewer surprises in the middle of the night.
Plan it. Test it. Do it now — before Microsoft forces your hand.